Table of contents
Preparing your Raspberry Pi
Installing an operating system
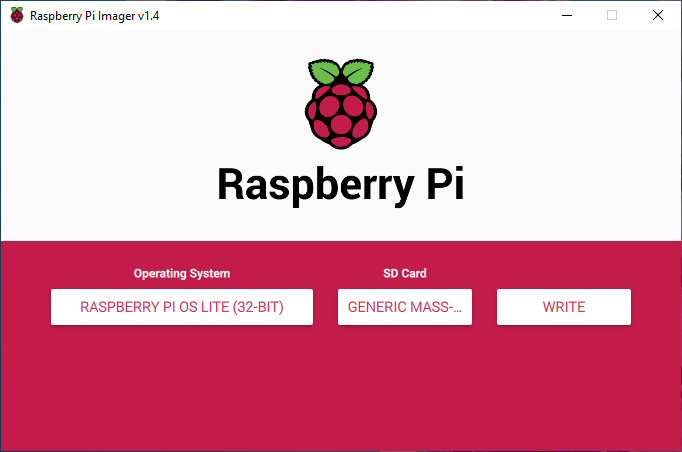
Raspberry Pi Imager is our recommended option for flashing a operating system to a SD card.
After downloading Raspberry Pi Imager, select Raspberry Pi OS Lite as your operating system, select your SD card and press write to start flashing your SD card. Unplug and plug the SD card back into the card reader to continue.
Enabling Wifi and SSH
Wifi
If you wish to use WiFi instead of LAN, create a file called wpa_supplicant.conf inside the boot partition.
cd /media/<yourname>/boot/ # change directory to boot partition
sudo nano wpa_supplicant.conf # open file in text editor nano
Add the following to your file:
ctrl_interface=DIR=/var/run/wpa_supplicant GROUP=netdev
update_config=1
country=DE

network={
    ssid="<your wlan name>"
    psk="<your wlan password>"
}
Press CTRL + x followed by y and then hit enter to save all changes.
SSH
You can access the command line of a Raspberry Pi remotely from another computer or device on the same network using SSH. For headless setup, SSH can be enabled by placing a file named ssh, without any extension, inside the boot directory on the SD card.
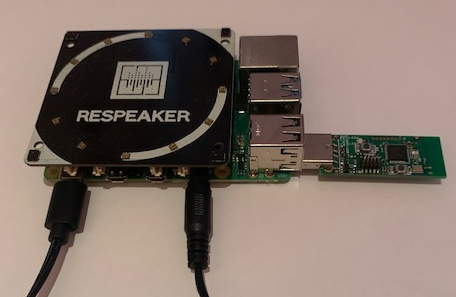
Assembling Hardware
- Insert SD card into your Raspberry Pi
- Attach ReSpeaker 4-Mic Array
- Plugin CC2531 ZigBee USB stick
- Plugin a sound device using the 3.5mm jack
- Plugin power supply
- Power your Raspberry Pi